For a wildlife photographer there is nothing quite like setting up your first camera trap.
For a few days I returned to the same patch of forest looking for any signs of wildlife; tracks, scat, fur, territorial markings, etc. And then it happened; fresh opossum tracks. It took me a few hours to set up and secure my gear. Then I kept checking my camera to fine tune focus and composition. I left feeling excited for all these incredible images my camera would capture of wildlife while I wasn’t there. I also left feeling apprehensive; hundreds of dollars worth of my photography gear was in the woods……
A week later I returned. That initial check was akin to being a child again on Christmas morning. My stomach tightened with excitement, my heart beat faster and faster. I opened the housing and scanned through the images. What did I capture? Nothing. Absolutely nothing.
This was going to be harder than I thought. Much, much harder.
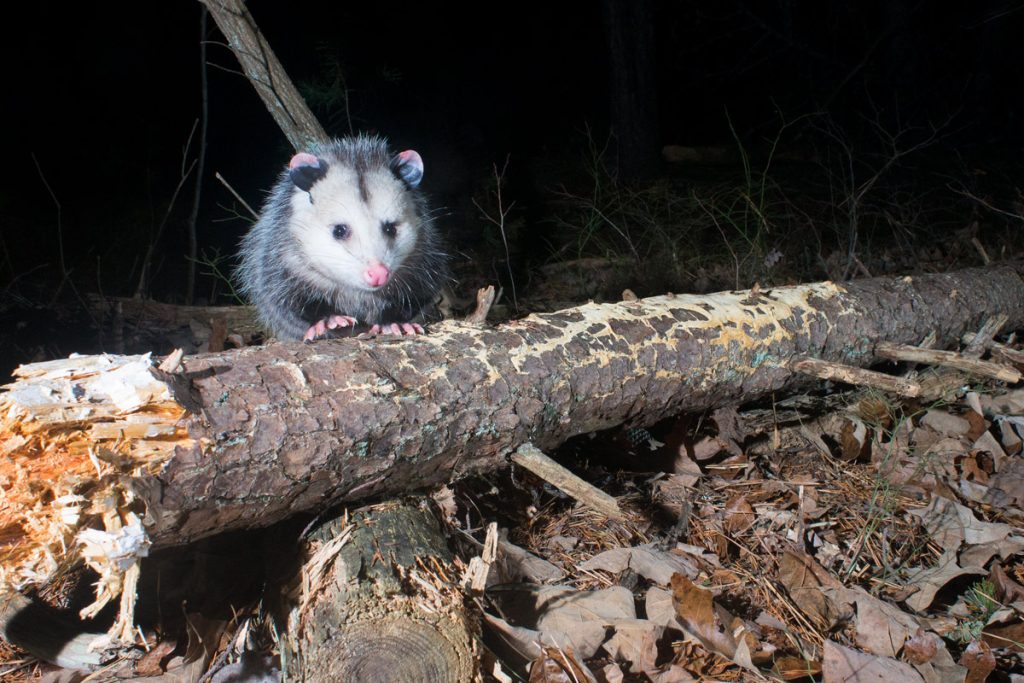
Table of Contents
What Is Camera Trapping?
The use of camera traps in wildlife photography dates back to the late 19th century through the work of pioneering nature photographer, and congressman, George Shiras III. Through his innovative use of flash and a tripwire he was able to capture images at night of animals that had never been seen before.
I originally became aware of this technique from the work of legendary National Geographic photographer Michael “Nick” Nichols. I was a barely a teenager when his story on tigers was published in the mid-1990s. I vividly remember the now iconic image of a tiger about to drink from a waterhole with both of its front paws extended onto the surrounding rocks. In the same story another image was published of a tiger about to leap right into the lens of the camera. I had never seen photographs like that before; they were so intimate, I felt like I was in the frame with the tiger.
I have no shame in admitting that I was the kid obsessed with animals (nothing has changed). I was more into my Zoobooks magazines and coffee table books of the Amazon and Serengeti than having a subscription to Sports Illustrated. Even then, I was pretty well versed in looking at wildlife photographs. But those tiger photos! How did he do that?
Fast forward to today and hunter’s, conservationists, and wildlife enthusiasts have employed this technique through the advent of affordable trail cameras. There’s no better way to survey wildlife. However the purpose of today’s article is custom system, like Mr. Nichols, using a DSLR or mirrorless camera, multiple off camera flashes, and either an active or passive infrared sensor. The animal trips the camera when it triggers the motion sensor, essentially taking its own picture. It is perhaps the most unique, fun, and frustrating form of photography. And I love it.
My education came from the hobbyists who posted their work and how-to guides on the message boards CamTrapper and Hag’s House. Unfortunately Hag’s House is no longer active but CamTrapper is. Much like the tiger story, the members of these boards were doing some of the most incredible photography I had ever seen and were happy to share their knowledge and experience. But the one thing I learned from all of them was that camera trapping was hard, the success rate is often next to nil, and you’ll need more patience than you ever had before.
The Technique
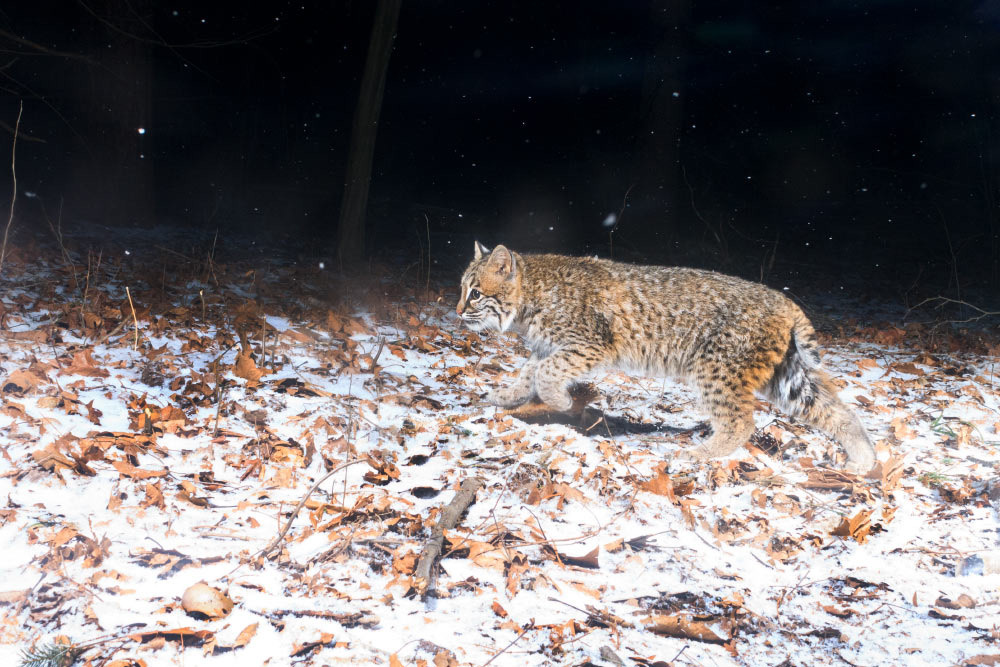
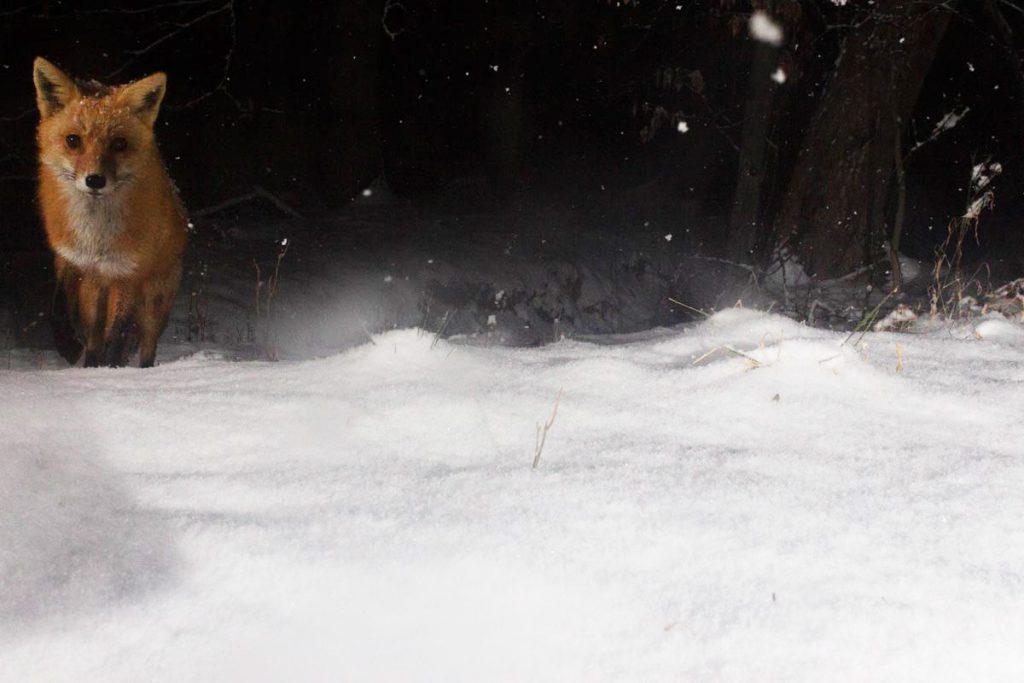
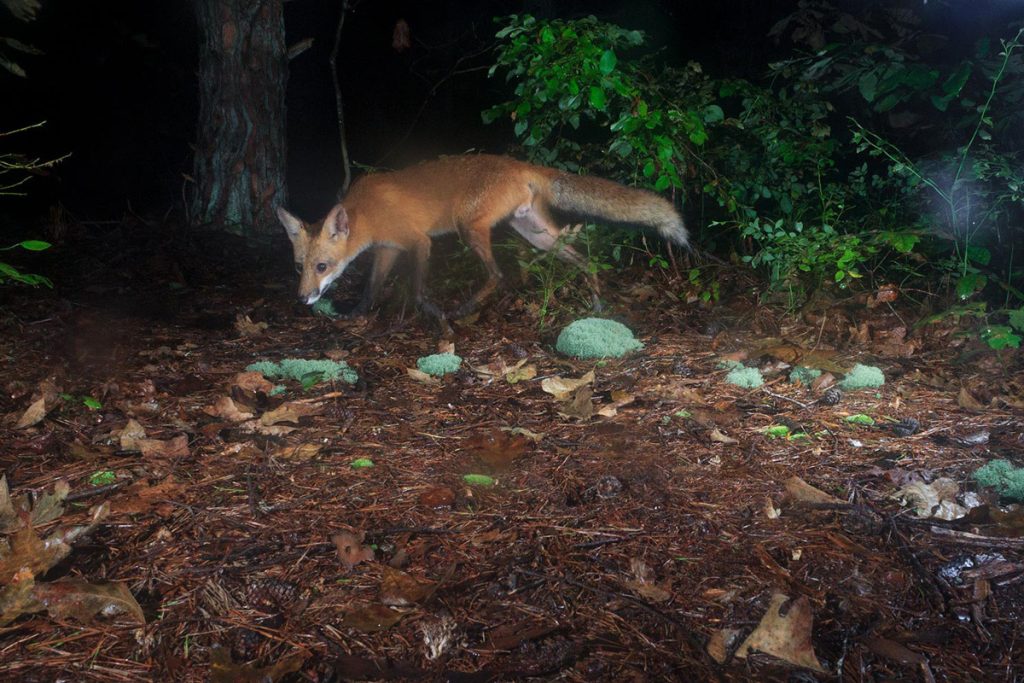
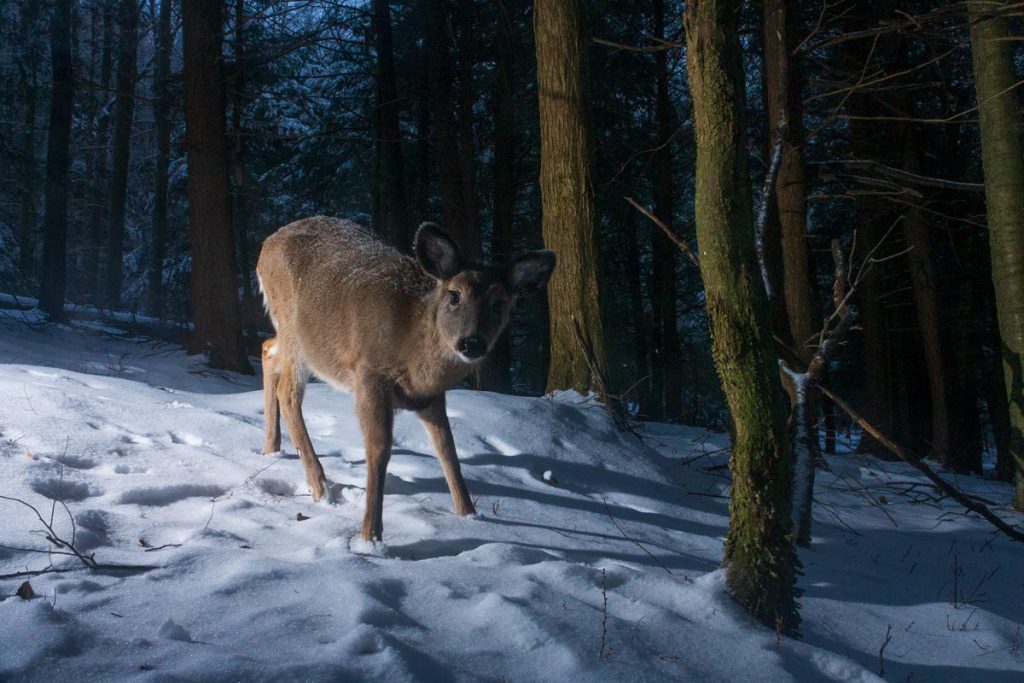
So why even bother implementing such a technique? The most common answer is to capture images of seldom seen fauna. The rare, elusive, and nocturnal; maybe those that have limited habitat. But also to photograph species that have a wide geographic range but live a very secretive existence, like the bobcat. Another frequent answer is one of aesthetics; it allows the wildlife photographer to capture images of an animal within the context of its’ environment. This is because camera trapping makes use of wide angle lenses. Most classic and contemporary wildlife photography is done with telephoto lenses. Think 300mm and above, but usually much more above.
When you factor in the use of tele-extenders the magnification is even greater. A telephoto perspective is one of compression, the distance between foreground and background become lost. For the safety of both yourself and the animal subject, a healthy (and often times legal) distance must be observed making this compression effect necessary. This is great for portraiture and documenting behavior but it’s also the reason why so many images begin to look similar. Wildlife in its environment are much story driven images, and why photographs made through camera traps are so unique.
It is much easier to begin today as there are companies that sell dedicated products specifically made for camera trapping, like Camtraptions and Cognisys. However one can build their own efficient system with the triad of camera, sensor, and lighting.
The Camera Setup
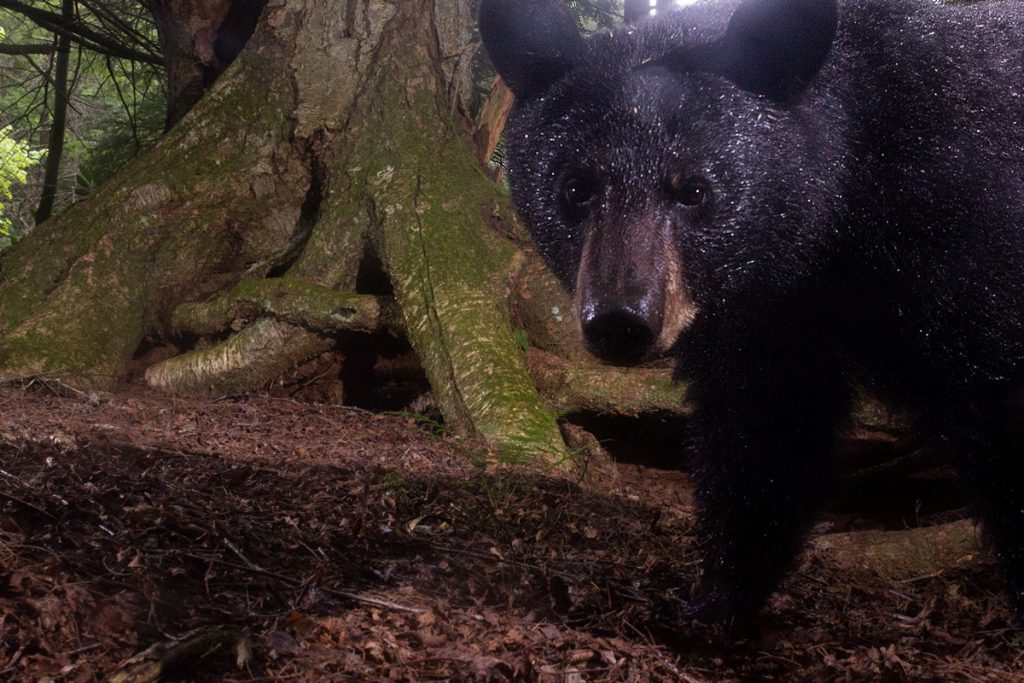
What brand of camera should you use? The truth is every major manufacturer is making incredible cameras today. I use Canon Rebel DSLRS for all of my camera trapping needs. The main reason is cost and weight. I can get older models of these cameras for pennies on the dollar. And the more set ups you have, the more that cost quickly rises. If a bear ever destroys one of your sets, as one did of mine, it wont hurt as much if it were a new, full frame, very expensive camera (thought it’ll still hurt!). I also like these cameras because there are numerous adapters available that allow you to use all sorts of old, manual focus, sharp lenses. With camera trapping you manual focus your lens, so auto focus is not a concern. For a DSLR, these cameras are also fairly light weight which is an added bonus because the weight of a set adds up fast when you have to hike a few miles.
You will also want to protect your camera from the elements with some sort of covering or housing. Some simply wrap their camera and lens in a freezer bag. If it were only a night or in my backyard I might consider but most camera trappers use a modified pelican case to protect their cameras. Besides protecting from the elements it’s also extra security if your camera takes a tumble. There are many tutorials on how to build a housing on YouTube.
Next you will need an infrared sensor to trigger your camera. An active sensor is two part system. A transmitter emits an infrared beam to a receiver, creating a very precise “line” that when broken wakes the camera. The benefit of such a system is the precision in placing the sensor where exactly you hope the animal will break the beam and eliminating false triggers that could occur. A false trigger are things you do not want to activate the sensor such as leaves in the wind, rain, and shadows. The problem with an active sensor is that you have two parts and depending on the location it might be difficult to place both sensors. Most camera trappers today use passive infrared sensors. These are the same sensors that wake up outside lighting systems. They have a fairly wide conical trigger area and detect motion and body heat. It is a one part system, uses less battery power, and after you place it in the direction you hope the animal will come you can forget it. They are prone to those dreaded false triggers though. When I started camera trapping there were times that I had a full memory card only to see that all the was captured were leaves in the wind. To make the sensor more precise I attached a small piece of PVC pipe onto the sensor which narrows the beam. To attached the camera I use a 3.5 stereo jack cable to connect the sensor to the camera. You’ll want to make sure you have the proper cable end for your camera to connect to a stereo jack cable as they are different. I run my cord through a thin plastic tube that I then wrap with camo-colored duct tape. This protects the cable from being chewed on by small rodents.
You will also need to light your scene using a few flashes. The flash of choice for most camera trappers is the Nikon SB-28. This model was manufactured during the film era but has reached legendary status amongst camera trappers. It has an amazing stand-by feature that allows the flash to conserve battery power while maintaining a charged capacitor. When the flash is awoken by the infrared sensor it can emit light on the first shot. This is so crucial because you may only get one chance at a photograph. I’ve kept mine in the field for almost a month with nothing more than the standard four double A batteries. To sync the flashes to the camera I use wireless transmitters and receivers much like you would use with a studio set up. I then house my flashes in either PVC pipes or plastic containers that I wrap in camo-colored duct tape except for where the flash will fire. I prefer my plastic containers because they are easier to set up. If attached to trees I simply use zip ties and if on the ground or something a more stable I’ll use small tripods rocks.
Setting up the gear takes some ingenuity. I have used tripods, light stands, ram mounts, arm clamps, tent stakes, etc when learning this technique. Today my most basic set up is attaching a housed camera on a tripod, placing the sensor in close proximity to the camera and pointed toward where I hope the animal will cross, and two to three flashes in plastic containers usually attached to trees as I do most of my work in forests. I try to check on my sets every two to four weeks. When I first started I checked daily since my set was close to home. What I found was that when you leave a set untouched the wildlife start to accept it as a fixture in the environment and then my success rate increased, albeit slowly. Though I did have a family of raccoons accept the set up way too much because they began climbing over my camera!
Tracking Skills
More important than any piece of camera gear or set up though is having outdoor and tracking skills. This is where you will need to channel your inner-mountain man and search for signs that an animal is using the area and learn its behavior.
When I decide on a location I try to frame the image with something of interest. It could be a log, how trees follow the path of a game trail, even my house (if I’m backyard camera trapping). If I do have something of interest I want to make sure I have my flashes placed in a way that illuminated all the elements. From there I make sure my depth of field is small, usually I have my lens set to f11. By doing this I have more chance of capturing the animal in focus.
Conclusion
I also recommend having low expectations, especially at first. Because with camera trapping I can guarantee something will go wrong. I’ve had equipment malfunctions, a storm knock down my camera, a black bear destroy an entire set up, batteries expire prematurely, and too many false triggers to count. There’s also no guarantee the animal will show up! However because of those hiccups I became more creative and technical with how I approach a set. I also try to think more like the animal based on the clues left behind.
From an ethical standpoint I do not bait my sets. I’ve seen those that do and it’s not natural. It’s one thing if you find a deer carcass and set your gear around it, but another if you put out cat food to purposely attract wildlife. I subscribe by truth in captioning from journalism. If every detail was made public of how you captured the image would you be ok with that? It takes time but you will get that awesome image.
When I got my first successful camera trap images, of an opossum, it was one of the most satisfying experiences I’ve ever had in photography. I had placed the camera at a log nearby some tracks I had found and after a month it finally used it! Seeing the image on my camera’s lcd was a like opening a big ol’ present. It was also the most “wild” look I had ever seen in an animals’ eye in a photograph. That’s probably because I wasn’t there, it took its own picture.